
Text and Photography by Wayne Cook
Reprint from Mustang & Fords Magazine, July 2001
WAKE UP YOUR
VINTAGE FORD
YOU’VE HEARD US HARPING ON THE SUBJECT OF Overdrive for a while, and we still feel the same way, perhaps even more so. No other swap brings your vintage Mustang or other special-interest Ford alive like the addition of another gear up top. Add Overdrive, and your buzz-bomb will become a quiet and smooth performer while achieving far better fuel mileage. Driver and passenger fatigue are dramatically reduced to the extent you’ll be wondering if you’re even riding in the same car as before. All of a sudden, those long-range road trips are a real possibility, instead of just a noisy pipe dream. Trust us when we tell you there are few performance modifications you can make to your street-driven car that are more important or nicer than the addition of Overdrive. Take a ride in a fiend’s car that’s had an Overdrive swap and you’ll see what we mean.
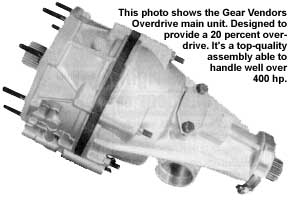
If changing transmissions is something you’d rather not do or you’re running a high-power application, you should consider an Overdrive unit from Gear Vendors Overdrive. This bulletproof unit fits behind the transmission you haveand allows you to overdrive any gear in your transmission.
Put a Gear Vendors unit behind your C4 three-speed automatic and you’ve got a car with six forward speeds and two in reverse. Sound cool? You bet, and the Gear Vendors unit is easy to install. It also allows you to retain your stock crossmember and shifter arrangement. You’ll need to shorten the driveshaft, but that’s necessary when you do most any kind of Overdrive swap.
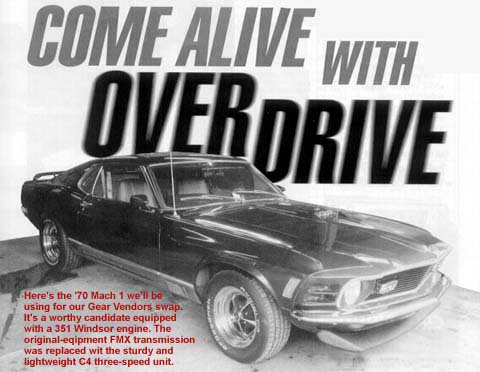
Follow along with us to Pony Concept Cars of Orange, California, and we’ll show you just what’s involved in installing a Gear Vendors unit. Our test car is Tim Love’s beautiful blue ’70 Mustang Mach 1. Tim is a Mustang veteran and he’s very excited about this project, so let’s look in on the action.
Page Two
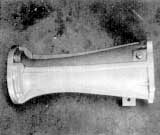
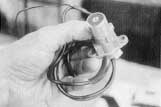
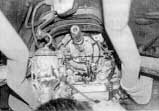
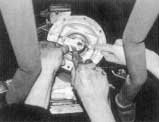
1. This tail-cone unit replaces the stock tailshaft housing on the C4, and allows the Gear Vendors gearbox to be bolted behind the existing trans.
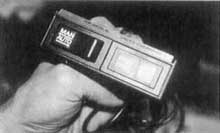
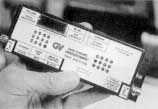
2. This small control panel goes under the dash inside the car, and controls the Overdrive engagement.
3. This foot-operated switch is also provided and allows foot control of your Overdrive unit. It’s especially useful when splitting gears is desired.
1. This central control module connects all components together, including the engagement solenoid, foot control, and vehicle speed sensor.
5. Besides the switch panel, central module, and foot switch, this photo shows the vehicle speed sensor and components needed to connect it in line to the vehicle speedometer. This allows the Gear Vendors unit to engage automatically at a given speed. You can set it and forget it.
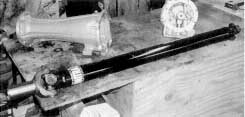
6. We already have our shortened driveshaft on hand, so Tim’s car can be on its way in one day. You’ll need to use a Spicer 1350 yoke on the gearbox end instead of the original size 1330.
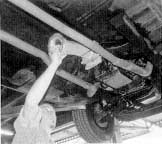
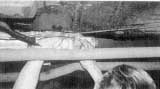
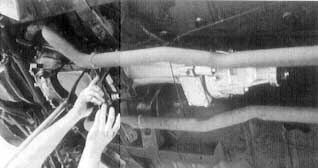
7. Here’s our landscape under the Mach 1. You can tell by the small sump pan that the trans is a C4.
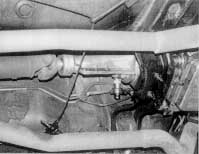
8. Another shot of the existing setup shows how the right angle drive equipment is needed for the speedo.
Page Three
9. After the driveshaft is removed, the transmission fluid is drained off. This sump pan had a drain plug. Most transmission pans don’t, and in this instance the whole pan needs to be removed.
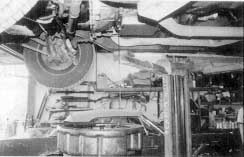
10. In this photo, we see the transmission being supported by a tranny jack while the crossmember is removed.
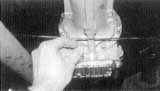
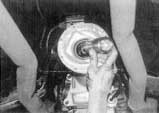
11. The speedometer drive gear in its housing must be removed before the tailhousing will come away.

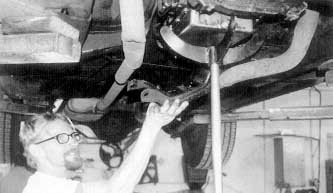
12. After all fasteners are carefully removed with an air ratchet, the C4 tailhousing comes away from the main body of the transmission.
13. With the tailhousing gone, the tedious but important task of removing the old gasket material is accomplished.
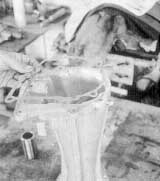
14. Before the new housing can be installed a new gasket is needed. It’s supplied with the Gear Vendors kit. Don’t use sealant here; install the gasket dry.
15. With the gasket in place, the new tailhousing is placed into position over the parking-brake cable.
Page Four
16. New fasteners with nylon collar inserts are used to fasten the tailhousing into position. The nylon collars built into the nuts make lock washers unnecessary.
17. Once all fasteners are seated, the next step is to install this splined coupler on the C4 output shaft. This sturdy part links the transmission and Gear Vendors unit.
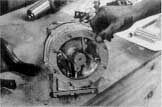
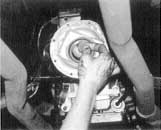
20. Back on the bench, a fresh gasket is installed on the face of the beefy-looking Overdrive gearbox unit.

21. The gearbox is heavy, and two technicians work together to make sure there are no accidents on installation. You wouldn’t want this item falling on your foot.
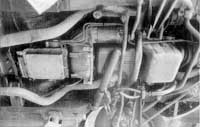
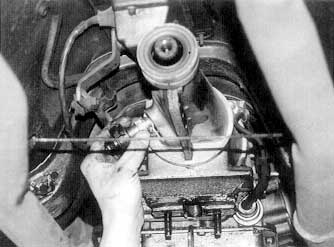
24. These wires connect the Overdrive engagement solenoid to the control module. All wiring is led up through the firewall to the vehicle interior. The control module must be protected from dirt and moisture.
25. Here we see the speedometer cable being routed from output to the vehicle speed sensor. With these connections complete, all that remains is to install our interior control components where desired, complete the electrical connections, install the driveshaft, and check your pinion angle. In less than four hours, Tim was ready to go with a super-durable Ovedrive setup in this Mach1.
18. Once the coupler is in position, this measurement is taken using the provided shims and a feeler gauge. A Small amount of endplay is required, and we must be careful not to add to many shims. To create a situation where there is no slack would be very bad and could damage both the transmission and Overdrive unit.
22. With the Gear Vendors unit fastened into place, the rear transmission mount is installed. It’s a perfect fit with the holes in the Gear Vendors housing exactly placed.
19. Once the correct measurement is determined, the appropriate number of shims are installed into the coupler.
23. The speedometer drive gear is now installed into the new tailhousing. Do not forget the O-ring, or you’ll be sorry when the transmission is filled!
PERFORMANCE PARTNERS
GEAR VENDORS, INC.
Dept. MF
1717 N. Magnolia Ave.
El Cajon, CA 92020
(800) 999-9555
(619) 562-0060
PONY CONCEPT CARS
Dept. MF
805 W. Collins Ave.
Orange, CA 92867
(714) 639-4457