
BY: Photography: Terry Cole
Reprint from Custom Classic Trucks Magazine, February 2005

![]() It’s been two decades since Detroit began offering overdrive transmissions as original equipment in virtually all vehicles rolling off their assembly lines. And while the OEM’s intent was to improve fuel economy and decrease engine wear, it wasn’t long before enthusiasts realized the performance gains that were possible by adding another gear with a ratio of less than one-to-one. With overdrive in high gear, hot rods could benefit by using a lower (higher numerically) rearend gear, which translated to greater acceleration without the inconvenience of higher rpm while cruising at highway speeds. This was akin to having your cake and eating it to, as high-output engines were allowed to run in their power range while blasting from stoplight to stoplight, only to be given a reprieve when it came time to hit the open road.
It’s been two decades since Detroit began offering overdrive transmissions as original equipment in virtually all vehicles rolling off their assembly lines. And while the OEM’s intent was to improve fuel economy and decrease engine wear, it wasn’t long before enthusiasts realized the performance gains that were possible by adding another gear with a ratio of less than one-to-one. With overdrive in high gear, hot rods could benefit by using a lower (higher numerically) rearend gear, which translated to greater acceleration without the inconvenience of higher rpm while cruising at highway speeds. This was akin to having your cake and eating it to, as high-output engines were allowed to run in their power range while blasting from stoplight to stoplight, only to be given a reprieve when it came time to hit the open road.
Perhaps the best example is Chevy’s venerable 700-R4, which has found its way into everything from Rat-powered pickups to lightweight small-block-motivated street rods. Of course, it
wasn’t too long before the factory overdrives started to show their weaknesses when never-satisfied power-mongers upped the ante in the horsepower department. Additionally, with a super-low First gear (3.06:1) and a tall overdrive (.70:1), this was an extremely wide spread of ratios throughout the transmission’s range-which didn’t allow the engine to best use its torque curve. These dilemmas helped create a cottage industry of developers and manufacturers who attacked the weak areas of the OEM gearboxes. And eventually, transmissions such as the 4L80-E were released from GM to handle the higher-power outputs that the racing and street performance scene required. It didn’t, however, rectify the widespread ratio drop.
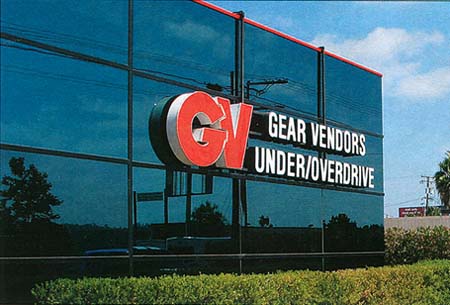
Despite the relative short history of factory overdrive transmissions, the idea of reducing the final drive ratio with an overdriven high gear is far from being new or revolutionary. In fact, El Cajon, California-based Gear Vendors has been offering its bolt-on overdrive

Page Two
 1.The working internals. This cutaway view of the GV under/overdrive unit shows the extreme quality of materials and workmanship that goes into each gearbox. From the heavy-duty clutch pack to the high-strength sun gear assembly, this unit not only provides a more efficient running vehicle, but one that, with the correct engine/rear gear combo, will plant you in the seatback.
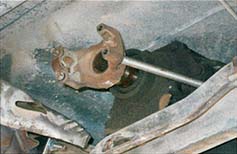
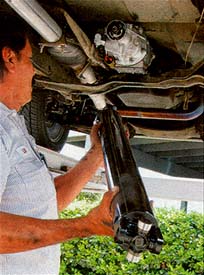
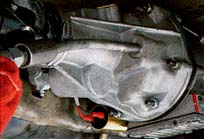
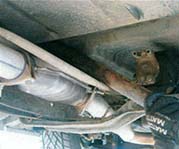 3. Here’s a look under our ’79 pickup. The first operation was to remove the original driveshaft. This truck came equipped with a two-piece unit from the factory. It was determined, based on its overall length, that it was just a tad too great a distance for the factory to use a one-piece. That won’t be a problem once the GV over/underdrive is in place.
 2. The GV design provides an almost unlimited ability to be adapted to any vehicle. Note the studs protruding from the front of the GV’s case; this is where various adapters allow the unit to be mated to everything from the basic Powerglide to a track-thrashing Jerico four-speed.
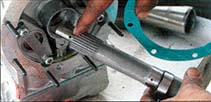
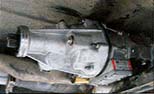
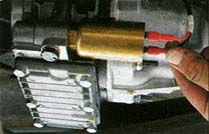
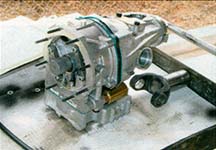 4.This is the unit that will find its way into the truck’s trans tunnel. The overdrive is compact and required no major modifications to fit in place.
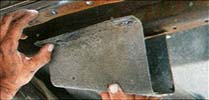
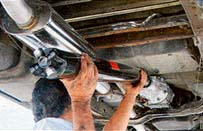
 5.The only interference was the factory heat shield around the catalytic converter. This wasn’t a problem that a pry bar, channel locks, and dead-blow hammer couldn’t solve.
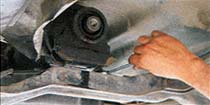
 6.The yoke required a little coaxing to slip out of the back of the stock TH400 transmission.6.The yoke required a little coaxing to slip out of the back of the stock TH400 transmission.
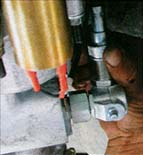
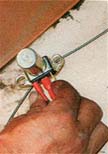
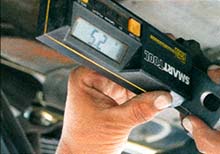 7.A digital angle finder was mated to the rearend’s yoke to determine if the pinion angle was correct. This truck came with a two-piece driveshaft, but a new one-piece will replace it.
HOW DOES IT WORK?
The easiest way to explain the way the Gear Vendors under/overdrive unit operates is to say that it splits the existing ratio spread of the transmission. The unit is designed to shift under virtually any throttle condition-either up or down-into what can be referred to as a half a gear. What you have is basically First gear, First-over, Second, Second-over, Third, and Third-over for a total of six speeds when using a typical TH400/350-type transmission. This is the key difference between the GV and other overdrive units: six forward gears, no clutch, always keeping the engine in the powerband.
As for the mechanical workings, the Gear Vendors under/overdrive is basically a compact automatic
transmission that employs components made from the finest materials, such as the expensive and time-proven reaction planetary system. Beefy parts abound inside the cylindrical case, such as hardened shafts and tough roller clutches. For maximum performance under heavy loads, like towing, there’s even an optional ribbed “deep sump” that increases the volume of transmission fluid and keeps it cooler.
All told, the Gear Vendors under/overdrive unit will allow you to maximize the potential of your machine, and at the same time have direct input on how to control it. Whether it is behind a 400-horse Camaro or a 1,200-horse Super Comp dragster, the under/overdrive can take the abuse.
Page Three
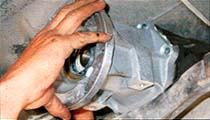
8.Once the yoke was removed from the TH400, the transmission mount was unbolted and the tranny was lifted off the crossmember. It’s advisable, at this point, to inspect the mount and replace it if it shows any wear.
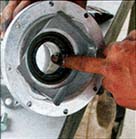
11. The Gear Vendors tailshaft adapter housing seals to the over/underdrive with a rubber O-ring. It’s important to make sure that the O-ring is properly seated in the machined groove of the housing.
14. Here’s the main reason that the coupler depth must be precise. The oiling holes in the new input shaft cannot be covered up. If the shaft is in too deep it is likely that they will be partially covered, thus infringing on the correct oil flow.
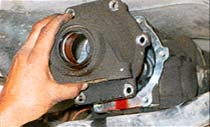
17. Installation of the adapter housing to the end of the TH400 is a precise, yet simple, operation. At this point, the bolts were installed and firmly tightened down.
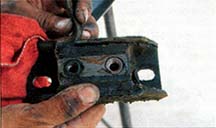 9. A worn mount will lead to noticeable vibration and can accelerate wear from virtually all the driveline components.
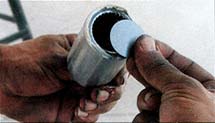
12. The coupler that connects the TH400’s splined output shaft to the new input shaft of the GV under/overdrive goes through a seal in the front of the adapter housing. It is important to grease the seal prior to installation, thus preventing a dry start and possible destruction of the seal.
15. Once the correct thickness was determined, the shims were installed inside the coupler on the side that goes over the TH400’s output shaft.
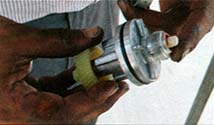
 18. Here’s the machined coupler that connects the TH400 and GV unit together. Installation is simple, however, there is a critical step involved which requires precise measurements with supplied shims.
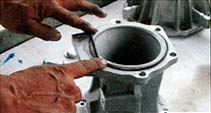
10. With the trans mount off and the transmission supported, the stock tailshaft housing was removed and set aside.
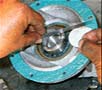
13. With the coupler installed, and the gasket in place on the mounting surface, a small straightedge was used to determine the gap between the end of the coupler and the face of the adapter housing. This dimension is important because it will determine how deep the new input shaft fits into the front of the GV under/overdrive pump. Shims were used to arrive at the correct depth. The metal shims were first used between the coupler and the straightedge.
16. A good thread locker was applied to the bolts used to fasten the adapter to the back of the TH400.
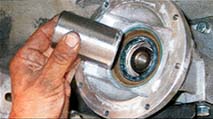
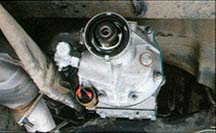
19. Here is the GV under/overdrive correctly mounted to the back of the adapter housing. Note the finned deep sump cover and the strapped rear oil seal. The deep sump is an option (which we replaced on this street-driven truck), but the seal retainer is standard and goes a long way in preventing the seal from pushing out the end.
for more than 25 years. And while many people who know the name Gear Vendors relate the company’s product to being best used to promote better fuel economy among gas-guzzling motorhomes and recreational vehicles, the reality is their bolt-on under/overdrive is virtually bullet-proof, adaptable to almost any type of transmission (automatic and manual), and a perfect match in even the highest-horsepower machines. In fact, the GV gearbox has been at home behind mega-horse drag cars for years, providing consistent
performance quarter-mile after quarter-mile. And, if top speed is what you’re into, GV-equipped Bonneville racers have been pushing the envelope with the under/overdrive for years on the Salt Flats.
The Gear Vendors unit is essentially a separate automatic gearbox that, with a simple bolt-on dedicated adapter, gives the stock tranny two personalities—effectively doubling its gear ratios throughout the entire range. So instead of having a beefy three-speed Turbo 400, you actually get an equally tough six-speed!
And with a closer ratio spread between shifts, you car’s engine will better use the power you’ve given it.
Today’s Gear Vendors’ under/overdrive offers the enthusiast multiple ways to take advantage of its benefits, entirely dependent on what type of driving he or she is doing. The operator can choose to have the overdrive shift automatically if when just cruising or he or she can shift through the gears manually for maximum performance.
Page Four
![]()
23-PERCENT INCREASES IN MILEAGE AND 100 PERCENT MORE FUN!
It is great to drive down the road at 75 to 80 mph and not have the feeling that you are abusing the engine. On long trips you really notice the decrease in interior noise due to the decrease in engine rpms. But the biggest improvement came when I made less visits to the gas pump as a result of the increased fuel economy. An honest calculation had the ’79 pickup’s mileage improving from 11.6 miles per gallon to 14.2 miles per gallon. That equates to a phenomenal 23-percent better fuel economy.
The best part of having a Gear Vendors under/overdrive in the truck is that it turned the Turbo 400 transmission into a six-speed. The Gear Vendors unit gives you two options when it comes to driving; the first is to put it on the automatic overdrive mode that can be programmed to shift into overdrive at any speed you set. In our application, we programmed it to shift into overdrive at 47 mph. The second option is to switch the Gear Vendors into the manual mode and begin gear splitting. The unit can also be programmed to shift from First gear to First gear overdrive automatically at a set mile per hour, which allows you to launch on the dragstrip. We programmed our unit to shift at 20 mph; this was the first time we had been able to chirp the tires while shifting.
Once you shift into Second gear, you can switch it out of overdrive and wait until you reach the top of Second gear and
switch into Second gear overdrive. Then once you shift into Third gear, once again switch it out of overdrive and wait until you reach the top of Third gear and switch it again back into overdrive. Hey, this was definitely a cool ride!
Gear splitting is the fun part of using a Gear Vendors under/overdrive. It gives you the ability to reduce your quarter-mile times by allowing you to keep the engine’s speed up between gears and stay in its optimum powerband. Every time you shift into overdrive you are adding 22 percent to your gear ratio. So you are turning your wide-ratio three-speed into a six-speed low-ratio under/overdrive.
Gear Vendors has just introduced their new six-speed and eight-speed auto shift control that automates even more of the gear-splitting feature.
While at Gear Vendors I had an opportunity to go for a test ride with Rick Johnson in his C5 Corvette with the new eight-speed conversion. It was incredible how much quicker the car accelerated than with the standard four-speed automatic.
We are in the process of building a more powerful engine for this truck; so stay tuned for our quarter-mile test with and without our new gear splitter. For now, with all-time high gas prices, we’ll take advantage of the savings at the pump.—Tim Foss
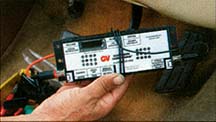
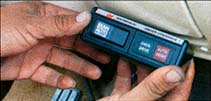 20. Once the unit was in place underneath, the next order of operation was to install the controls. The GV under/overdrive system comes with this cool-looking control panel. Its obvious mounting position was on the dash, within arm’s length, no less.
 23. To keep the control box out of harm’s way it was mounted under the dash, up high on the firewall. Once in place, it was simply a matter of drilling a hole large enough for the wiring harness, stringing the wires to the solenoid on the under/overdrive unit, and plugging the remaining wires into the dash-mounted control panel and foot-operated shift switch.
 26. A slick right-hand spe-edo cable adapter is used to offer better clearance for the cable and to help keep it away from the catalytic converter and an almost-certain failure.
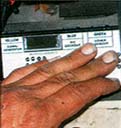
 21. The brains of the system, the GV’s ECU. This little computer offers a host of options for shifting the under/overdrive.
 24. The speedometer adapter fits in the rear of the GV under/overdrive housing. It’s important to lube the O-ring seal.
 27. Here’s the installed unit with all the connections—sans driveshaft—in place
 22. The foot activated shifter switch, similar to an old-style, floor-mounted dimmer switch, is used to activate the GV unit on vehicles with column shift. The floor shift or console shifter gets a button on the shifter. Mounting it was piece of cake—two screws right into the floorboard.
 25. Connecting the wires to the GV’s solenoid is simple. It only takes two.
 28. Since our donor truck was originally equipped with a two-piece driveshaft, it included this bracket for mounting the center bearing. With a new one-piece shaft ready to install, the bracket had to be removed. Since it was riveted in place, an air chisel was used to knock off the old rivets.
Page Five
![]()
| ||||||||||||||||||||||||||||||||||||||||||||||||||||||||||||||||||||||||||||||||||||||||||||||||||||||||||||||||||||||||||||||||||||||||||||||||||||||||||||||||||||||||||||||||||||||||||||||||||||||||||||||||||||||||||||||||||||||||||||||||||||||||||||||||||||||||||||||||||||||||||||||||||||||||||||||||||||||||||||||||||||||||||||||||||||||||||||||||||||||||||||||||||||||
And, unlike most performance-enhancing equipment, installing the Gear Vendors’ under/overdrive isn’t complicated. From underneath, in most cases, all that’s required is shortening the original driveshaft, removing the factory tailshaft housing and fitting the adapter and under/overdrive to the back of the transmission, and hooking up a couple of wires and the speedometer cable (with its requisite adapter). The unit even bolts to the original trans mount.
Inside the vehicle, you’ll need to install the foot-activated shift switch (or one attached to the gear shift handle), the computer control unit (ECU), and the dash-mounted control panel. All the hardware is included and simple to work with.
Although we’ve been aware of the Gear Vendors’ popularity, we had never taken the opportunity to have one installed in a project vehicle. Recently we were given the change when GV President Rick Johnson called and invited us to drop in and have one of his units installed in a ’79 shortbed pickup that we’ve been working on. While Rick and his crew provided the ultimate installation opportunity for our cameras, the simple truth is, with the exception of having the driveshaft shortened (or, in our case, switched from a two-piece to a one-piece model), any mechanically adept enthusiast can do this installation in his home garage in matter of hours. There’s virtually no fabricating to be done, and we saw only one hole being
drilled (for the wire loom).
After following along as Rick’s crew completed the installation, the obvious benefit to our pickup (at this state, anyway) was improved fuel economy, of which we saw an immediate increase (see sidebar). But with a plethora of suspension and brake upgrades already under its belt and a new motor waiting in the wings, we’re betting there’s more to come in the fun-factor department—especially when we lower those rear cogs and improve those 0-to-60 times exponentially. Follow along and you’ll see how easy it is to do the install, and then stay tuned for a performance update in a future issue when we head back to the track with our Gear Vendors-equipped hauler. CCT
 29. The new driveshaft came with bran-new universal joints on each end. Make sure you replace the ones in your shortened driveshaft, as well.
 30. Installation of the new driveshaft is pretty straightforward. Of course, make sure that the bolts holding the straps (or U-bolts) in place are torqued according to specs.
 31. The last operation before driving our hauler was to fill up the GV under/overdrive with the requisite transmission fluid. Fluid capacity for our non-deep sump is 28 ounces. The deep-sump model holds and extra 14 ounces.
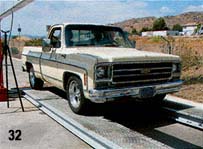
32. The drive to GV’s El Cajon-based headquarters was comfortable, albeit sedate. The drive home was much more fun!
Dept. CCT
1515 State College Bvld.
Anaheim, CA 92806
(714) 778-5825
CRAGAR FORGED ALLOYS
WELD WHEEL INDUSTRIES
Dept. CCT
6600 Stadium Dr.
Kansas City, MO 64129
(800) 669-9353
www.weldracing.com
Dept. CCT
1717 N. Magnolia Ave.
El Cajon, CA 92920
(800) 999-9555
www.gearvendors.com
(800) 581-2982
www.nittotire.com
PERFORMANCE SUSPENSION
TECHNOLOGY
Box 396, Dept. CCT
Montville, NJ 07045
(800) 247-2288
www.p-s-t.com